Introduction – What is the issue and how you overcome it
Vmware Workstation is easily one of the most advanced and popular software tools for creating and working with virtual machines. Despite being a favorite amongst system administrators and I.T technicians one annoying issue can prevent you from working with your virtual machines.
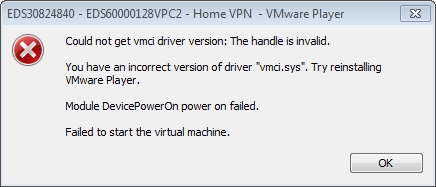
One such error which I have personally encountered is the “vmci.sys driver error“, this message generally appears on Windows computers and can be caused by a number of different factors. This particular error deals with a key driver which is responsible for running several features of the software.
This error often occurs in older versions of Vmware Workstation particularly the version 8 series when trying to launch an existing Virtual machine or create a new one.
This particular error can also occur if you have upgraded Vmware Workstation or your Windows operating system, most likely coming from Windows 7 to Windows 8 or 10. If you are faced with this error don’t worry because in this tutorial we will explore some different solutions to bypass this and get your virtual machines back to a working state.
Steps:
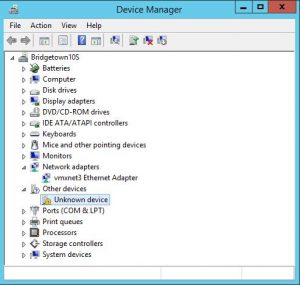
The first and foremost step to troubleshooting this problem is to update or reinstall the vmci driver in Windows. This can easily be done by navigating to the start menu and searching for “device manager” or going into Control Panel –> Hardware and sound and then choosing device manager.

With that dialog open you will see a list of your PC’s drivers that are installed on the system, once here you should notice a yellow exclamation mark next to a driver labeled “vmci”. Simply right-click it and select update driver and then choose “Let Windows find the best driver“, wait until the process finishes, and then close the dialog.
In most cases, this will correct the issue if you had an outdated driver left behind if you upgraded Vmware Workstation or player. There are however cases where this simply doesn’t work and requires a little more effort to work.
If the above method fails then you can try uninstalling all copies of VMWare Workstation/Player and then rebooting before reinstalling the software. This may not be practical however if you can’t find your product key or you no longer have the installation media then this may not be an option.
If you are able to do this and upgrade it is the best solution to fix things and get back up and running and will save you time in the future.
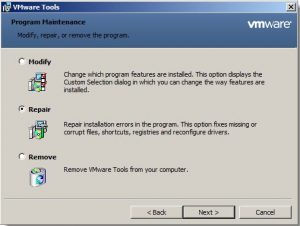
Another method that may fix the problem is to repair your installation when prompted in the uninstall interface.

Before proceeding with the next method try disabling your antivirus/anti-malware software while you try reinstalling or installing Vmware Workstation. Sometimes these security programs interfere with the installation procedure, if this still doesn’t resolve the issue try the next alternative workaround to help fix the error.
Alternative method:
If updating the drivers fails then there is a little trick to help get your VM’s working once more, first ensure all virtual machines are shut down and all open Vmware related processes and windows are fully closed.
Next, launch My Computer and locate where your Virtual machines are stored, if you haven’t changed the installation path your virtual machines will be stored in the default path:
C:\users\yourusername\Documents\Virtual Machines
Upon finding your files open the relevant folder and locate a .vmx file inside, you may need to enable hidden file extensions in Windows to see this. Once done you need to right-click on the file and select “open with” From, from here choose Notepad from the list.
Now that you have that selected press OK and you should see a bunch of text inside of Notepad, this is the main configuration file for the virtual machine you located before. At this point scroll down and look for the following line of code:
vmci0.present = “true”
Simply change the “true” to “false” and keep everything else the same, then just close Notepad and choose to save when prompted to save the changes you made. Now that you have edited that file repeat the process for all affected Virtual machines and apply the same change to those .vmx files.
Conclusion
Lastly, launch the Vmware workstation or Vmware player application, and your Virtual machine should work fine and boot without any error messages related to the vmci driver.
Did this information help you out? Share it with your friends & family and comment below and Check out our software tools and videos and business services such as Web hosting, SEO, China sourcing, and more.
Other posts you may like:
How to find your wifi password on Windows
Best learning management system for small businesses
Top rated Australian Crypto apps/exchanges
Some of the best Crypto wallet/exchanges for New Zealanders

Alessio Rigoli is the founder of AGR Technology and got his start working in the IT space originally in Education and then in the private sector helping businesses in various industries. Alessio maintains the blog and is interested in a number of different topics emerging and current such as Digital marketing, Software development, Cryptocurrency/Blockchain, Cyber security, Linux and more.
Alessio Rigoli, AGR Technology
![logo-new-23[1] logo-new-23[1]](https://agrtech.com.au/wp-content/uploads/elementor/thumbs/logo-new-231-qad2sqbr9f0wlvza81xod18hkirbk9apc0elfhpco4.png)

I have updated VMCI driver from the Device Manager and it fixed the issue. Thank you!
YES!! It has been Work…. thank you
Antivirus is the issue. The setup should not give any error while install. Please run as administartor when you run the setup and turn off antivirus, if any.
Turning vmci0 value to false is not at all a good approach.
this is not a fix. A fix is how to install those drivers with no errors. They are responsible for bridge and host network.
Hi Roger, thanks for the suggestion that’s a fair point. When I originally wrote this it was meant as a last resort in case nothing else worked. I will try to include some steps to troubleshoot the drivers in the article.
at the end I uninstall VM 14. Reboot. I login as administrator and I installed again and at the end it works. It was a bit weird. Anyway, thank you 🙂