Take ownership of files in Windows

Video tutorial
When working with Windows one annoyance is the inability to modify particular files because you don’t have the appropriate access rights for the folder in question. This is built into the system in order to protect users from accidentally damaging critical system files.
While this has good intentions it can interfere with power users who often need to tweak certain files or tinker with the inner workings of Windows to get things done.
In Linux, one can simply launch a terminal window and run their file manager as root to modify whatever files they want and then quickly log out and secure their files again.
You may also like: ssd best practices
One workaround inside Windows is to take ownership of a file and essentially change its permissions to make your user account the owner.
Normally the process of doing this involves typing out multiple commands in the command prompt. While this may be ok for one or two folders it is rather annoying particularly if you need to use this function frequently which can not only be annoying but often time-consuming.
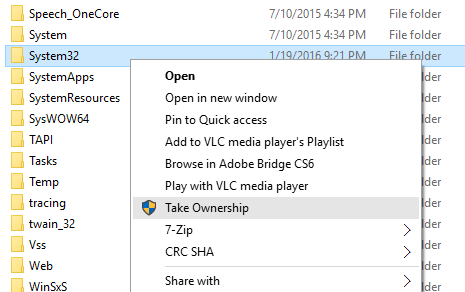
In this tutorial we will take a look at a fast and simple way to add a handy “Take ownership” option whenever you right click on a file or folder within Windows, in order to get started you will need to make sure your account is an Administrator.
To do this simply open Control panel then go to User accounts & Family safety and then finally User Accounts. From here select your user account and then press “change your account type” from here choose administrator.
Once done you can proceed to add the registry hack to your system, first off download the following .zip file and save it to your desktop.

Once extracted you should find two files inside one called install and one named remove, simply double-click on the “TakeOwnershipInstall.reg” file to start the process. You should immediately receive a popup box with the following warning.

At this point simply click yes to the warning and you should be presented with a dialog stating the keys have been successfully integrated into the Windows registry.
Now just press ok and you’re done. Now, whenever you right click on a file or folder you will see an additional option which says “Take Ownership”.
Clicking this will open a prompt, upon pressing yes a command prompt window will open and run all the commands for you very fast.
Conclusion
That’s it now you can modify whatever files you may need to without having to type out multiple commands for what should be simple for advanced users.
If at any time you want to remove this simply repeat the above process but instead choose the “RemoveTakeOwnership.reg” file to get rid of it from your computer.
Now you can finally modify your files without much interference inside Windows
Enjoy this article and find it helpful? Follow AGR Technology on Twitter, YouTube and check out our software and services for more.
Last updated 22nd of July 2020

Alessio Rigoli is the founder of AGR Technology and got his start working in the IT space originally in Education and then in the private sector helping businesses in various industries. Alessio maintains the blog and is interested in a number of different topics emerging and current such as Digital marketing, Software development, Cryptocurrency/Blockchain, Cyber security, Linux and more.
Alessio Rigoli, AGR Technology
